
DIY Wall Paneling & Slat Walls: The Budget Glow-Up Your Boring Walls Have Been Begging For
The Great Wall Glow-Up: Turning Boring Walls into Architectural Main Characters
DIY wall paneling and slat walls are the home decor equivalent of putting on a perfectly tailored blazer over your favorite T-shirt: same you, dramatically sharper silhouette. With the cost of full renovations soaring, homeowners are skipping the sledgehammer and reaching for trim, MDF, and a brad nailer to give their walls a “custom home” look on a “please-don’t-check-my-bank-account” budget.
In this guide, we’ll walk through today’s trending wall panel looks, how to plan them like a pro, tools you actually need (and which ones TikTok is overhyping), and clever design tricks to keep your space feeling expensive, not overdone. Expect dad-level puns, honest tips, and encouragement to measure at least twice before you fire that nail gun.
Why Is Everyone Suddenly Attacking Their Walls?
If your feed looks like a support group for former blank walls, you’re not imagining it. DIY paneling and slat walls have exploded because:
- Short-form DIY videos make 8-hour projects look like 30-second sorcery. If they can do it in 60 seconds, you can absolutely do it in a weekend (and a half).
- Carpentry costs are up, so adding trim instead of rebuilding entire walls is the wallet-friendly way to get character.
- Versatility: This works for modern, farmhouse, Scandi, boho, and minimalist styles. It’s a decor chameleon with a nail gun.
Whether you’re in a rental trying not to terrify your landlord, or in a forever home trying to convince your walls they’re from a fancy boutique hotel, paneling is the glow-up of the moment.
Meet the Wall Paneling All-Stars (Pick Your Main Character)
Think of these styles as different genres of the same movie: same core plot (add depth), different vibe, equally dramatic before-and-after.
1. Board and Batten: The Crowd-Pleaser
Board and batten is the “jeans and a nice top” of wall treatments. It works in entryways, dining rooms, bedrooms, and yes, that mysterious wall behind your sofa that’s never known commitment.
You simply add vertical or grid-like trim on the wall and paint everything one color. For style:
- Farmhouse Cozy: Soft white, cream, or greige with warm wood accents.
- Modern Moody: Deep charcoal, navy, forest green, or even black for a hotel-lobby vibe.
- Kid-Friendly: Half-wall board and batten with a wipeable paint finish = fewer visible crayon crimes.
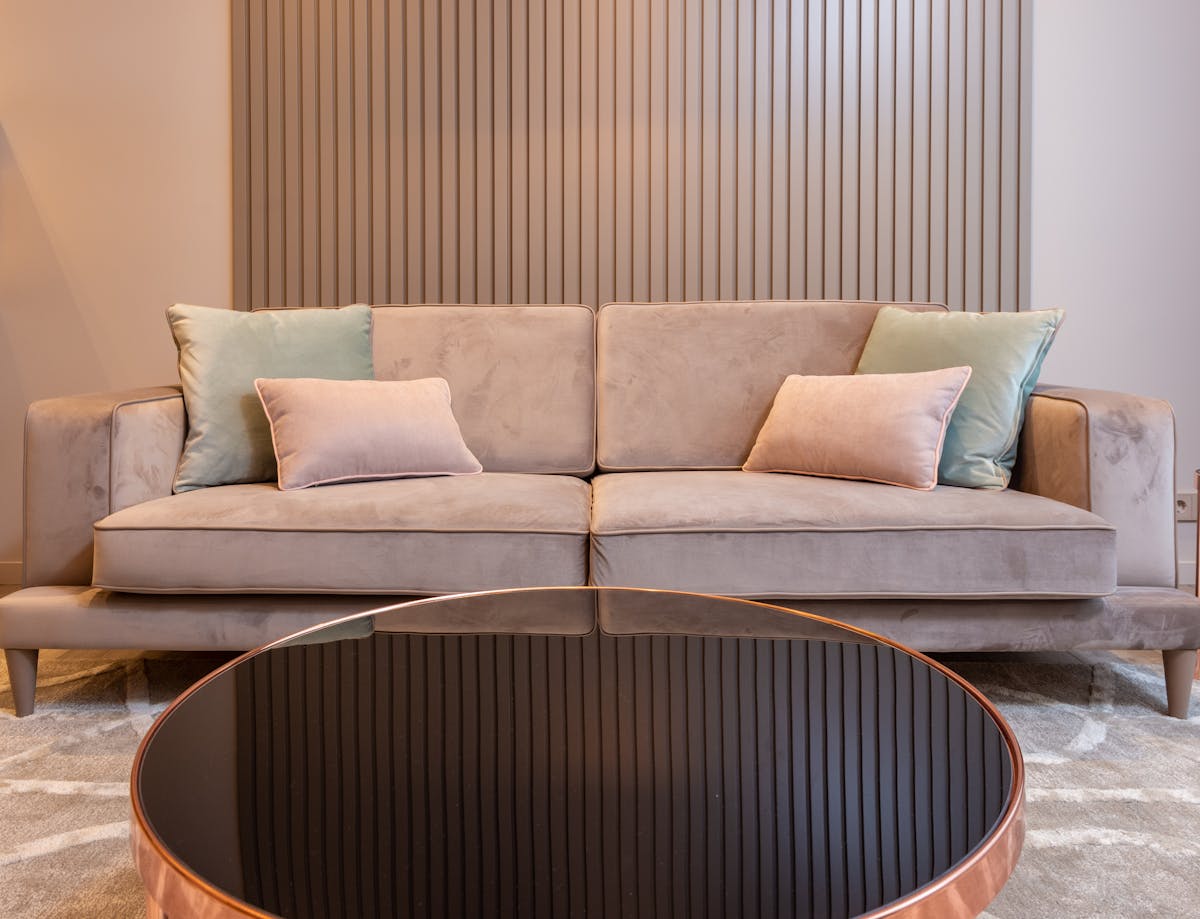
2. Slat Walls & Fluted Walls: The Influencer
Slat walls are the cool kid on social media right now: slim vertical wood strips spaced evenly, often against a darker backing. They’re turning up:
- Behind TVs for a clean, modern media wall.
- As bold headboard walls in bedrooms.
- As room dividers in open-plan spaces.
For budget-friendly builds, homeowners are using MDF or PVC slats instead of solid wood, then staining or painting for the look they want. Add LED strip lights behind them if you want your wall to whisper, “I cost way more than I actually did.”
3. Picture-Frame Molding: The Parisian Daydream
Picture-frame molding is thin trim arranged in rectangles or squares, usually painted the same color as the wall. The result: instant “I might own antique art, or at least a really good candle collection” energy.
It’s trending especially in European-inspired spaces with:
- Neutral walls and oversized mirrors.
- Sculptural lighting instead of busy decor.
- Minimal furniture that lets the walls be the drama.
4. Half-Walls & Wainscoting: The Space-Saver
Wainscoting and half-walls let you have character and breathing room. Panel the lower half, then paint or wallpaper above. This is especially good for:
- Small bedrooms: Visual interest without making the room feel shorter.
- Hallways: Protection from scuffs, backpacks, and rogue laundry baskets.
- Dining rooms: Adds formality but still plays nicely with bold art above.
Design tip: In tighter rooms, keep paneling color the same or just a shade deeper than the wall color to avoid a “chopped in half” look.
Plan Before You Nail: Turning Ideas Into a Game Plan
Before you sprint into the lumber aisle like it’s Black Friday, pause. Planning is the difference between “designer feature wall” and “why are those rectangles… grimly uneven?”
- Measure the wall (and then again).
Note height, width, and any outlets, vents, or switches. These will affect your layout and where panels or slats should land. - Sketch it out.
Use graph paper or a simple design app. Plan how many panels or slats you want and decide spacing before you spend on materials. - Test with painter’s tape.
Mark where boards or slats would go. Live with it for a day. Trip over your dog while staring at it. Make adjustments. - Choose your finish wisely.
Semi-gloss or satin is easier to clean in high-traffic areas; matte or eggshell can be prettier in bedrooms and living rooms but shows scuffs more.
Tools & Materials: The Starter Pack for Wall Wizardry
The good news: you do not need a full workshop to pull this off. Most trending panel projects use a simple, repeatable toolkit.
Core Tools
- A saw (miter saw is ideal; a miter box and hand saw can work for smaller projects).
- Level (bonus points for a laser level, but a classic bubble level still slaps).
- Brad nailer or hammer and finish nails.
- Caulk gun and paintable caulk.
- Wood filler and sanding block.
- Measuring tape and pencil (hide from anyone who chews on pencils).
Popular Materials
- MDF strips: Smooth, affordable, and easy to paint. Great for board and batten or picture-frame molding.
- Pine boards: Ideal if you want a stained wood look or more depth to your trim.
- Pre-made slat panels: These click or mount directly; excellent if you want the slat look with less fuss.
- Backer boards: Often painted black or deep tones behind slat walls to give that crisp, shadowy gap look.
If you’re nervous about commitment (to your walls, not your relationships—that’s above my pay grade), look into peel-and-stick slats or panels mounted with strong removable strips. Perfect for rentals or for people who like to redecorate as often as they rewatch their favorite shows.
Step-by-Step: From Flat Wall to “Wait, You Did That Yourself?”
The exact details change by style, but most panel projects follow this basic rhythm:
- Prep the wall.
Clean, fill major holes, lightly sand glossy paint, and remove baseboards if the design calls for it. Future you will thank present you. - Mark your layout.
Use your tape measure, level, and painter’s tape to mark where each board or slat will go. This is where the math happens—snacks recommended. - Cut and test-fit.
Cut pieces slightly long, dry-fit against the wall, then trim for precision. Walls are rarely as straight as they claim to be. - Attach boards or slats.
Use construction adhesive sparingly plus nails to hold pieces in place. Check for level obsessively. Your future photos will expose any tilt. - Fill, caulk, and sand.
Fill nail holes with wood filler, caulk any gaps where boards meet the wall or each other, and lightly sand once everything is dry. This is how you get the “built-in” look. - Prime and paint.
Prime raw MDF or wood, then apply two coats of paint. A quality roller and angled brush make the difference between “Pinterest” and “why are there streaks everywhere?”
Take progress photos as you go. Not only are they excellent for social media clout, they’ll also remind you how far you’ve come when you’re tired, covered in dust, and questioning your life choices.
Styling Your New Feature Wall: Don’t Overdress the Celebrity
Once your wall is finally a main character, you don’t want to smother it with clutter. Think of your new paneling as a celebrity on the red carpet: you’re here to accessorize, not compete.
- Behind a TV: Keep decor simple—maybe a low console, a plant, and one or two subtle objects. Let the wall do the heavy lifting.
- Bedroom headboard wall: Use layered bedding, calm color palettes, and soft lighting. Wall sconces integrated into paneling or slats look luxurious for far less than a full remodel.
- Entryway: Pair board and batten with hooks, a slim bench, and a statement mirror. Functional and photogenic—our favorite combo.
- Dining room: Wainscoting plus a simple gallery of art or one oversized piece feels intentional, not busy.
Let There Be Light: Highlighting All That Hard Work
Today’s most-saved paneling posts aren’t just about the trim—they’re about lighting. Think of light as your wall’s personal hype squad:
- LED strips behind slat walls = instant futuristic lounge.
- Picture lights over picture-frame molding = gallery vibes.
- Sconces integrated into wainscoting = boutique hotel, minus the resort fee.
Aim for at least two to three light sources in any room with a feature wall: overhead lighting, accent lighting on the wall, and a lamp or two for softness. Your new paneling deserves to be seen from every flattering angle.
Common Mistakes (So You Can Smugly Avoid Them)
A few things creators are very honest about in their tutorials—and you’ll want to dodge from the start:
- Skipping primer on MDF: It will drink your paint like iced coffee in July. Prime first, always.
- Random spacing: Uneven gaps between slats or panels scream “rushed.” Measure, mark, use spacers, breathe.
- Overcomplicating tiny spaces: In a very small room, keep patterns simple or just panel one wall to avoid visual chaos.
- Ignoring outlets and switches: Plan around them early so you’re not cutting awkward notches at the eleventh hour.
- Going too trendy without considering your home’s bones: A super-industrial slat wall might fight with a very traditional home. Blend, don’t battle.
Your Walls Are Bored. Time to Fix That.
DIY wall paneling and slat walls are popular for a reason: they’re a realistic, budget-conscious way to get custom-looking architecture without selling a kidney or living in a construction zone for six months. With thoughtful planning, a handful of tools, and a willingness to learn from your first few cuts, you can absolutely pull off a big transformation.
Zoom out, pick the style that fits your home’s personality (and your patience level), and start with a single wall. Before you know it, you’ll be casually saying things like, “Oh, that? Yeah, I built it,” as your guests stare at your once-boring wall like it just walked off a magazine cover.
Your walls have waited long enough for their moment. Grab the tape measure—star-making time has arrived.
