
DIY Organic Wall Décor Glow-Up: Limewash, Plaster & Textured Accent Walls That Make Your Paint Jealous
When Your Walls Want a Personality: The Rise of DIY Organic Wall Décor
Your walls called. They’re tired of being flat, beige, and emotionally unavailable. They’ve seen the limewash and plaster transformations all over TikTok and would like to speak to management (that’s you).
Across home décor communities right now, people are skipping busy gallery walls and making the wall itself the artwork. Limewash, hand-troweled plaster, and textured accent walls are the new “it” makeover: big impact, low drama, and absolutely bursting with cozy, organic character.
The best part? These projects are DIY-friendly, weekend-sized, and surprisingly affordable. You don’t need a contractor; you need a bucket, a brush, and a willingness to look mildly ridiculous while standing on a step ladder making cloudlike brushstrokes. Let’s turn your drywall into a main character.
Why Textured Walls Are Trending Harder Than Your Sofa
Flat, perfect walls had their moment. Then we collectively realized we actually like things that look lived-in, soft, and a tiny bit imperfect—kind of like your favorite pair of jeans, but for your living room.
- High impact, low chaos: A single textured feature wall can transform a room more than swapping every piece of furniture. And you don’t have to move your kitchen to do it.
- Organic, European vibe: Limewashed and plastered walls look like they belong in a centuries-old Mediterranean home, not a freshly built blank box. They whisper “timeless,” not “builder basic.”
- Minimalist but not boring: When your wall has movement and depth, you can keep décor simple. Fewer frames, fewer knick-knacks, more visual calm.
- Budget- and renter-friendly: Most DIYers are doing feature walls for under $150 using joint compound, paint, and some nerve. Many limewash techniques can be painted back over when you move out.
In short: textured walls let you be dramatic without tearing down a single wall. Iconic behavior.
Pick Your Wall’s Alter Ego: Limewash vs Plaster vs Microtexture
Before you start slapping product on the wall like butter on toast, you need to choose your look. Think of this as picking your wall’s new haircut.
1. Limewash Effect: Soft, Cloudy, “Did Paris Decorate This?”
The limewash effect is all about gentle movement and depth. You’ll see soft, overlapping strokes that almost look like watercolor on a huge scale.
Best for: Bedrooms, dining rooms, and walls behind sofas or beds where you want calm, cozy vibes.
How people are doing it:
- Using true limewash paint for that matte, chalky, velvety finish.
- Or faking it with flat paint thinned with water or glaze, applied with large masonry or limewash brushes.
- Working in cloudlike or criss-cross strokes, always keeping a “wet edge” so it blends softly.
The result? A wall that looks hand-painted, a little moody, and very expensive… even if it cost you less than a takeout habit.
2. Plaster / Roman Clay Look: Smooth, Subtle, “I Vacation in Tuscany”
Plaster-look walls are for those who want depth and texture but still like things polished. Think soft, tactile, and ever so slightly mottled.
Best for: Living rooms, entryways, and statement fireplaces where you want your walls to flex just a little.
DIYers are using:
- Pre-mixed joint compound (yes, the stuff for drywall).
- Or specialty Roman clay / plaster products for refined finishes.
- Simple tools: a drywall knife, flexible trowel, or even a plastic putty knife.
You spread it thinly, let it dry, then lightly sand so the highs and lows blend into a subtle, touchable surface. It’s like your wall got a spa facial.
3. Microtexture & Arched Details: Quiet Drama for Detail Nerds
If you love a subtle accent, microtexture and raised shapes are your new playground.
Popular moves right now:
- Using painters’ tape to outline arches or simple geometric shapes.
- Spreading a thin layer of joint compound inside the taped shape.
- Peeling the tape, sanding the edges, then painting everything the same color.
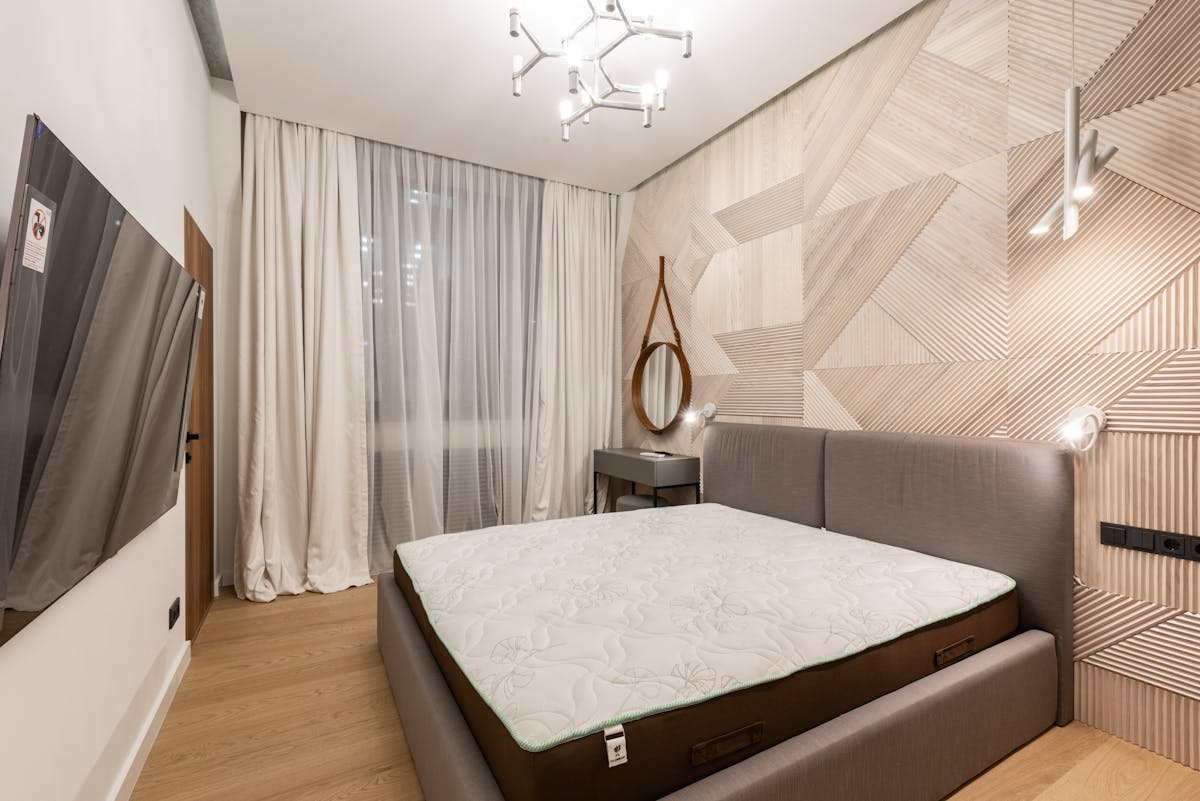
You end up with tone-on-tone, raised shapes that look built-in and custom. These pair beautifully with arched mirrors, boho décor, and Mediterranean-inspired styling.
Choosing Colors: The New Neutrals (and the Bold Baddies)
Textured walls plus on-trend color is where the magic really happens. Right now, warm, earthy tones are running the show.
Trending neutrals:
- Clay & sand: Soft beige with a hint of warmth—perfect for boho and farmhouse décor.
- Mushroom & warm taupe: Gentle gray-browns that look high-end and forgiving.
- Soft greige: The peace treaty between gray and beige that works with almost everything.
For the bold at heart:
- Rust: Rich and cozy in living rooms or around fireplaces.
- Olive: Earthy, calming, and stunning in bedrooms or dining rooms.
- Charcoal: Moody, modern, and great behind a bed or sofa as a feature wall.
Pro tip: because textured finishes catch light differently, always test a patch on your actual wall and look at it morning, noon, and night. Your wall has many moods; you should meet all of them before committing.
Your DIY Wall Glow-Up Toolkit (a Drama-Free Shopping List)
You don’t need a contractor or a 25-piece trowel set. You just need the basics and a willingness to vacuum dust later.
- Drop cloths and painter’s tape (your floors and trim will thank you).
- Sandpaper or sanding sponges (medium and fine grit).
- Joint compound or plaster product (for texture and raised details).
- Big, soft brushes for limewash or faux-limewash.
- Putty knives or a flexible trowel for plaster effects.
- Paint tray, mixing bucket, and stir stick.
- Primer, if your wall is glossy, patchy, or just… suspicious.
Most weekend warriors are clocking in under $150 for a feature wall, depending on wall size and product choice. That’s less than you’d spend on a big piece of wall art—and here, the wall is the art.
Step-by-Step: From Flat Wall to “Excuse Me, Are You Custom?”
Let’s walk through a simplified weekend game plan. Adjust as needed based on your chosen technique.
Step 1: Prep Like a Pro
- Move furniture away from the wall and cover it with drop cloths.
- Wipe down walls to remove dust and mystery smudges.
- Fill nail holes and small dings with spackle; sand smooth once dry.
- Prime if your wall is glossy or heavily patched.
Boring? Yes. Essential? Also yes. Texture will highlight what’s already there, so give your wall a decent starting point.
Step 2: Limewash Effect in Action
- Thin your paint or use limewash according to directions. Aim for a consistency like melted ice cream, not soup.
- Load a large brush lightly and work in random, overlapping strokes—X’s, clouds, swooshes—avoiding perfectly straight lines.
- Work in sections, keeping a wet edge so you don’t get harsh overlaps.
- Let it dry and decide if you want a second, softer pass to build depth.
Embrace imperfection. If you’re a perfectionist, consider this your exposure therapy.
Step 2 (Alternate): Plaster / Roman Clay Vibes
- Use a putty knife or trowel to spread a thin layer of compound in random, overlapping strokes.
- Let it dry fully. It will look a little terrifying; that’s normal.
- Lightly sand to knock back high spots and soften trowel lines.
- Wipe away dust, then paint or glaze over the texture with your chosen color, using a roller or brush for extra variation.
You’re aiming for a surface that feels handcrafted but not like a stucco accident.
Bonus: Raised Arch or Shape Details
- Lightly sketch your arch or shape on the wall with pencil.
- Use painter’s tape to outline the shape cleanly.
- Apply joint compound inside the taped area, keeping it fairly even.
- Peel tape while the compound is still slightly soft for crisp edges.
- Sand once dry, then paint the whole wall one color for that built-in look.
This trick looks custom millwork-adjacent with none of the power-tool-induced panic.
Styling Your New Textured Wall: Less Stuff, More Intention
Once your wall is serving sculpted, European, organic excellence, resist the urge to cover it with 34 frames and a macramé explosion. Let it breathe.
For minimalist home décor lovers:
- Keep art oversized but minimal—one large canvas instead of many tiny pieces.
- Use slim, simple frames in wood or black to contrast the softness of the wall.
- Choose neutral textiles (linen, cotton, wool) that echo the wall’s earthy tones.
For boho décor fans:
- Layer woven baskets or one statement textile against the wall (not the entire store’s worth).
- Add plants in terracotta or stone pots to echo the organic texture.
- Mix in a vintage rug or wooden bench to warm everything up.
For modern farmhouse enthusiasts:
- Pair textured walls with rustic wood beams, black metal accents, or a chunky console.
- Use simple, muted art—vintage landscapes, botanicals, or black-and-white sketches.
- Keep color palettes simple: creams, taupes, warm woods, a touch of charcoal.
Think of your textured wall as the lead actor; everything else is supporting cast. If anything starts stealing the show, edit ruthlessly.
Renter-Friendly Moves (aka: How Not to Lose Your Deposit)
If your landlord thinks “bold design” means eggshell paint, you can still play:
- Try limewash-inspired techniques using regular paint thinned with water; it’s usually easy to repaint later.
- Keep texture subtle—very thin layers that can be sanded smooth if needed.
- Focus on removable décor that complements your wall: leaning art, picture ledges, and freestanding shelves.
Worst-case, you have a sanding day before you move out. Best-case, your landlord begs you to leave the walls as a “feature.”
Common Mistakes (So You Can Avoid Cry-Painting)
A few pitfalls you absolutely do not need to experience personally:
- Too much texture too fast: Thick plaster layers can crack or look clumpy. Build slowly; thin is in.
- Skipping samples: Texture + color can look wildly different on your wall than on your mood board. Always test.
- Over-decorating: If you cover every inch of your textured wall, you’ve basically paid money for a very fancy background character.
- No dust management: Sanding without a drop cloth and vacuum nearby is an extreme sport. Don’t do it.
Remember: imperfect is part of the charm. Aim for “beautifully handcrafted,” not “I fought the wall and the wall won.”
Your Walls, But Make Them Main Character Energy
Textured, limewashed, and plastered walls are popular right now because they deliver the dream combo: high-impact transformation, warm and organic character, and the satisfaction of doing it yourself without rearranging your entire life (or floor plan).
Whether you’re making a soft, cloudy limewash bedroom, a sleek plaster living room, or a microtextured arch moment behind your console table, you’re turning plain surfaces into something that feels designed, intentional, and uniquely yours.
Your paint cans have gotten away with the bare minimum for years. It’s time your walls got the glow-up they deserve—and honestly, they’re going to look so good your furniture will have to try harder.
Image Suggestions
Placement: After the section “Pick Your Wall’s Alter Ego: Limewash vs Plaster vs Microtexture”, supporting the sentence: “You end up with tone-on-tone, raised shapes that look built-in and custom. These pair beautifully with arched mirrors, boho décor, and Mediterranean-inspired styling.” and the keyword “limewashed and plastered walls”.
Placement: Within the “Step-by-Step: From Flat Wall to ‘Excuse Me, Are You Custom?’” section, under the “Plaster / Roman Clay Vibes” article, supporting the sentence: “Use a putty knife or trowel to spread a thin layer of compound in random, overlapping strokes.”
