DIY Wall Magic: Textured Walls & Paneling That Make Your Home Look Rich on a Renter’s Budget
DIY Wall Paneling & Textured Walls: The Glow-Up Your Rooms Have Been Waiting For
DIY wall paneling and textured wall treatments like slat walls, limewash, and renter-friendly panels are one of the fastest ways to upgrade a space on a budget. With a few clever techniques, you can turn flat, boring walls into high-impact, architectural-feeling backdrops that make your home look custom without major renovations.
If walls could talk, most of them would be whispering, “Help.” The good news? TikTok, Instagram, and YouTube are currently obsessed with dramatic wall makeovers, which means there’s a buffet of trendy ideas ready for you to steal lovingly borrow. No sledgehammer, no contractor, just you, some MDF, paint, and a slightly chaotic weekend.
Today’s obsession: DIY wall paneling and textured walls—slat walls, fluted panels, grid and board-and-batten, limewash, plastery paint, ledges, and renter-friendly peel-and-stick wizardry. Think of this as a style menu: pick your level of commitment, your vibe, and your budget, and let’s turn your walls from “builder-basic beige” into “wait, did you hire a designer?”.
Why Everyone Is Suddenly Staring at Their Walls
Wall upgrades are having their main-character moment across #walldecor, #homeimprovement, and #bedroomdecor for a few excellent reasons:
- They’re high impact. One accent wall can transform an entire room in a way a single rug simply can’t.
- They’re budget-friendly. MDF, paint, and joint compound cost less than replacing furniture, but make everything you already own look more intentional.
- They’re camera-ready. Textured and paneled walls photograph like a dream, which is why they dominate room reveals and before-and-after content.
- They fit almost any aesthetic. Cozy minimalism, modern farmhouse, Scandinavian, boho—there’s a wall treatment for every style crush.
In other words, walls are your biggest blank canvas. You’ve already paid for the square footage; you might as well let it work as hard as your Wi‑Fi.
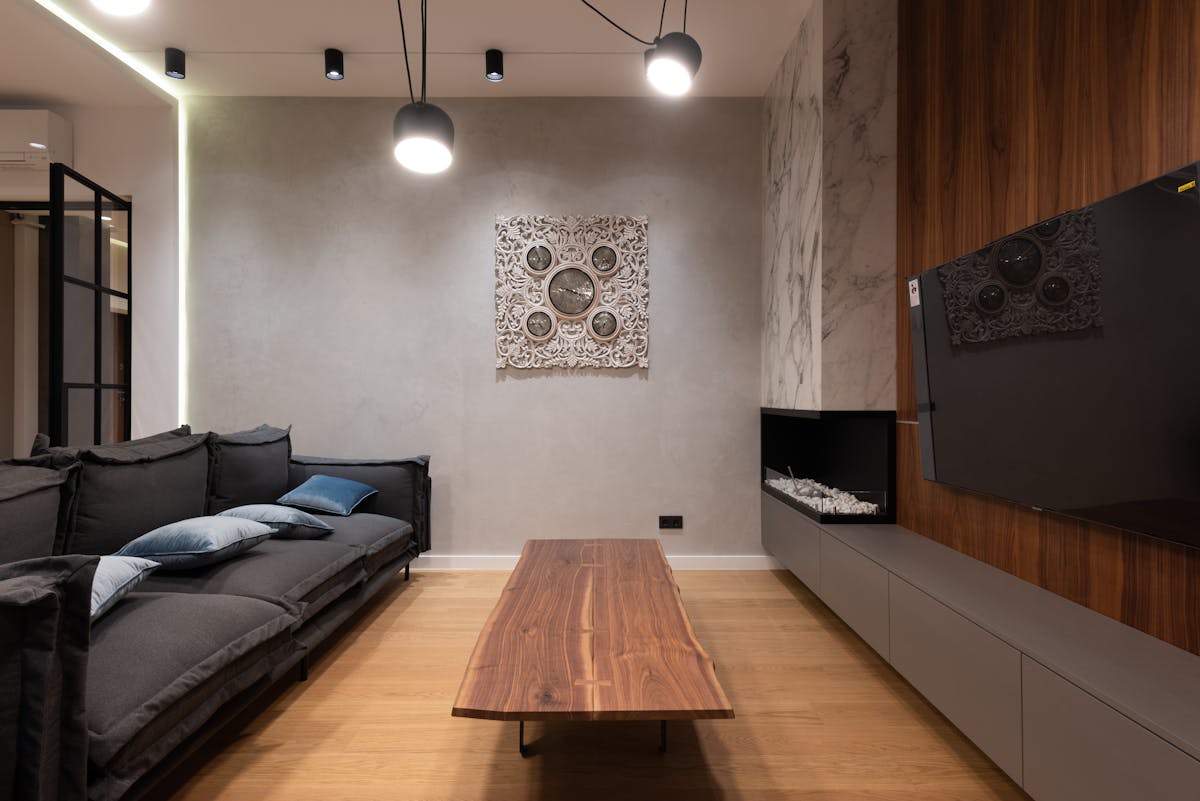
1. Slat & Fluted Wall Panels: The Vertical Botox for Tired Rooms
Vertical slat and fluted walls are everywhere right now—behind beds, TVs, sofas, and in entryways. They’re the sleek, modern cousin of the feature wall, stretching your space visually and adding that “custom millwork” feel without the “custom millwork” invoice.
Where to Use Them
- Behind your bed as a faux headboard that frames the whole wall.
- Behind the TV so the TV finally looks “on purpose” instead of “plunked here.”
- In an entryway to create a mini “arrival moment” with hooks and a bench.
Basic DIY Game Plan
You’ll usually see people using MDF or pine boards cut into narrow strips, glued and nailed vertically to the wall, then painted all one color. The monochrome look is what makes it feel polished and expensive—even if you know you did it in sweatpants.
- Measure your wall (height and width) and decide how wide and spaced you want your slats.
- Have the hardware store rip MDF sheets into strips, or buy pre-cut slats or fluted MDF panels.
- Find your studs, mark them, and snap a level line so the first slat goes on straight (very important for your future sanity).
- Attach slats with construction adhesive and brad nails, using a spacer (like a scrap of wood) to keep gaps consistent.
- Fill nail holes, caulk the edges, and paint everything the same color.
Pro Tips So It Looks Designer, Not Dorm Room
- Match the mood: Deep charcoal or earthy browns for cozy minimalism, warm white or greige for Scandinavian calm, black for high drama.
- Mind your scale: Narrow slats = more modern and refined; wider boards = more casual and rustic.
- Stop at the right height: Floor-to-ceiling for drama, or about two-thirds up the wall for a European boutique-hotel vibe.
Styling hack: Keep the furniture on that wall simple. The wall is now the outfit; the furniture is the jewelry.
2. Board & Batten and Grid Paneling: Instant Architecture on a Budget
Board and batten and grid paneling (sometimes called “box trim”) are the dependable best friends of DIY wall decor. They’re beginner-friendly, endlessly adaptable, and they work in living rooms, dining rooms, hallways, and bedrooms.
Choosing Your Style: Classic vs. Modern
- Board & batten: Vertical strips with a ledge or cap rail. Great for modern farmhouse, coastal, and transitional styles.
- Grid / box paneling: Evenly spaced squares or rectangles. Perfect for modern, Scandinavian, and contemporary spaces.
Simple Step‑By‑Step (Grid Version)
Think of this as drawing on your walls, but with wood and fewer erasable moments:
- Measure your wall and decide how many boxes you want horizontally and vertically.
- Use painter’s tape first to “draw” your grid. Adjust until it looks balanced with your furniture and ceiling height.
- Cut MDF or pine trim pieces to size and attach them along your tape lines.
- Caulk seams, fill nail holes, and sand lightly.
- Paint the whole wall one color—yes, including the baseboards for a really custom look.
Color & Styling Ideas
- Dining rooms: Deep green or navy grid paneling + simple art = moody restaurant energy at home.
- Bedrooms: Soft taupe or clay behind the bed = instant boutique hotel vibes.
- Hallways: Half-wall board and batten in a darker shade, with the top half in a soft neutral = character without claustrophobia.
Bonus: Even your most basic IKEA pieces look more intentional in front of paneled walls. It’s like giving your furniture a LinkedIn-appropriate background.
3. DIY Limewash & Textured Paint: Soft, Cloudy, and Very “I Vacation in Europe”
Limewash and plaster-effect finishes are the cool, understated trend kids of the wall world. Instead of flat, crisp paint, you get soft movement and depth—perfect for neutral, minimalist spaces where pattern feels like too much, but plain feels like not enough.
Two Main Routes
- True limewash / specialty paint: Ready-made limewash products you apply with a large brush in swooping X or cloud-like strokes.
- DIY texture mix: Standard paint + pre-mixed joint compound, troweled or stippled on for a faux plaster look.
How to Nail the Look (Without Making a Blotchy Mess)
- Start with a sample wall. Test behind a door or on a small section before committing room-wide.
- Use a big brush, not a roller. For limewash, work in organic “X” strokes; don’t overwork any one area.
- Layer, don’t panic. The first coat will look scary. The second and third coats bring the magic and even things out.
- Stick to neighbor tones. Choose shades from the same color family (warm on warm, cool on cool) to avoid patchy, dirty-looking walls.
Where Limewash Really Shines
- Bedrooms: It softens light and makes the whole room feel calmer and cozier.
- Living rooms: Pairs beautifully with linen sofas, wood tones, and simple art.
- Entryways: Adds instant “wow” for guests in the smallest amount of space.
Think of limewash as the wall equivalent of soft-focus lighting—flattering, forgiving, and slightly mysterious, in the best way.
4. Accent Niches & Ledges: For the Commitment-Phobic Decorator
If you like to rearrange your decor the way some people rearrange their feelings, picture ledges and shallow niches are your new best friends. They let you style, restyle, and overthink your vases and prints without turning your wall into Swiss cheese.
Why Ledges Work So Well
- Flexible styling: Swap art, books, and objects seasonally without new holes.
- Renter-friendly: Fewer anchors, more visual impact.
- Great for small spaces: Vertical styling without taking up floor area.
Simple Styling Formulas
Use these cheat codes for ledges that always look intentional:
- Art + object + negative space: One framed print, one sculptural object (like a vase), and one deliberate gap.
- Layers and overlap: Lean larger art in back, smaller frames slightly overlapping in front.
- Odd numbers: Style in 3s or 5s; our eyes like it better.
For built-in niches, paint the inside a slightly darker or richer shade than the main wall. It’s like contouring for your architecture.
5. Renter-Friendly & Removable Wall Upgrades
If your lease says “no painting” but your heart says “this beige must go,” removable options are your loophole to happiness. Peel-and-stick wall panels, faux slats, and textured wallpapers are exploding across renter content for a reason: they deliver big drama with low commitment.
Smart Removable Options
- Peel-and-stick fluted panels: Pre-textured strips you can cut and mount to mimic a slat wall.
- Textured peel-and-stick wallpaper: Linen, grasscloth-look, or subtle stone texture for depth without paint.
- Foam or lightweight 3D panels: Great for temporary headboards or behind desks in rentals.
How to Keep Your Security Deposit (Mostly) Intact
- Test a small piece first in a low-visibility area to see how your walls react.
- Clean the wall before installing to ensure good adhesion and easier removal.
- Follow the manufacturer’s removal instructions—usually low, slow peeling at an angle.
Pro move: Design your peel-and-stick feature behind your main furniture piece (bed, sofa, desk). It looks intentional and, if anything goes slightly wrong, the furniture is doing most of the hiding.
6. Planning Your Wall Glow-Up: Choose Your Own Adventure
Before you buy forty-two slats and a gallon of paint on pure enthusiasm, pause and ask your space a few questions.
Step 1: What’s the Room’s Personality?
- Cozy minimalist bedroom? Try limewash or soft plaster texture behind the bed.
- Modern living room? Go for a sleek vertical slat or fluted TV wall.
- Traditional dining room? Board and batten or grid paneling in a richer color.
- Small entry or hallway? A ledge or half-wall treatment for charm without overwhelm.
Step 2: Be Honest About Your DIY Energy
Wall upgrades range from “one podcast episode” to “entire weekend and emotional journey.” Rough guide:
- Low effort: Peel-and-stick panels, ledges, simpler limewash.
- Medium: Board & batten, basic grid paneling, textured paint.
- High: Floor-to-ceiling slat walls, full-room paneling, built-in niches.
Step 3: Keep It Cohesive
If you upgrade one wall dramatically, show the others a little love too—maybe a fresh coat of paint or a simpler treatment in the same color family. You want “designed home,” not “this one wall has a personality and the others need coffee.”
7. Practical Tips So Your Wall Project Actually Works IRL
- Prep is not optional. Clean walls, patch holes, and gently sand shiny paint before you start. Texture and paneling highlight imperfections if you skip this.
- Buy 10–15% extra materials. Mis-cuts and “math is hard” moments happen.
- Paint samples on site. Colors look different on textured vs. flat walls and in natural vs. artificial light.
- Check outlets & switches. Plan how your slats or panels will work around or behind them before you install anything.
- Document the process. Take before, during, and after photos. Future-you (and your followers) will thank you.
Remember: most of what you see online is the final, filtered result. Your project may look chaotic in the middle—that’s normal. Keep going, keep caulking, keep painting.
Final Coat: Your Walls, But Make Them Main Character
Whether you’re team sleek slat wall, moody grid paneling, or soft limewashed cloudscape, wall treatments are one of the smartest ways to get a designer look on a DIY budget. A single weekend project can make your home feel more custom, more intentional, and frankly, more like the Pinterest board you’ve been curating at 1 a.m.
Start with one wall, one room, one idea. Give your walls a little personality, and the rest of your decor will suddenly look like it belongs in a magazine—without you needing to sell a kidney for new furniture.
And when you’re done, post that before-and-after. Your wall didn’t go through a full character arc just to stay off the feed.
Suggested Images for DIY Wall Paneling and Textured Walls